How to Make Raspberry Fringe Earrings
Use your SilverSilk Pipe Chain to create a sweet, hoop finding for a fringe earrings style. Pipe Chain makes a strong foundation for many types of beadwork. SilverSilk Pipe Chain is a revolutionary knitted wire jewelry chain. The 3mm knitted wire cord has a 1.5mm hole through the center of the chain that is perfect for stringing onto beading wire in this design. For more details on versatile Pipe Chain, check out the education page here. Follow along each step in this tutorial guide, as well as in video form, to create this flowy-fringe style!
Before we dive into the magic, let's gather our tools and materials:
Tools:
Cutters (Lindström Tools): Flush cutters make precise cuts to your Pipe Chain and beading wire
Chain Nose Pliers (Wubbers Tools): Will be used to attach your ear wires to your hoops
Crimping Pliers: Needed to form crimps on beading wire to secure your hoop
Size 11 Hard Beading Needle: To complete brick stitching and fringe stringing
Optional, Thread Burner: For finishing tails of excess thread
Optional, Loctite Glue: for extra security placing the Pipe Chain End Caps
Materials:
8in • SilverSilk Pipe Chain, Bronzite
4 • SilverSilk Pipe Chain End Caps, Antique Copper
2 • Earring Wires, Antique Copper
2 • 2mm Crimp Tubes
16in • Fine or Medium Size Beading Wire. Sample Uses SoftFlex Metallics Fine in Copper
4grams • Size 8/0 Seed Beads. 1gram each of four colors
1gram • Size 15/0 Seed Beads
36 • 4mm Fire Polish Beads
250in • Size B or D Beading Thread, Wildfire Ultra, or 4lb Fireline
Raspberry Fringe Earrings Video Tutorial
Raspberry Fringe Earrings Written Step-By-Step Guide
Step 1: Creating a Hoop Finding with Pipe Chain
Cut two lengths of Pipe Chain, each 4in.
Tip: Use chain nose pliers to remove any wire fuzzies from the pipe chain ends. When you cut pipe chain, there sometimes can be extra wire splinters at the ends that require being plucked off using your chain nose pliers. It’s important to do this because those wire fuzzies tend to get in the way of fitting an end cap on. You can easily weed them with chain nose pliers.
Next, cut two lengths of beading wire, each 8in. String the Pipe Chain onto the beading wire and place the Pipe Chain End caps onto each end of the Pipe Chain.
Tip: At this step, you can apply a small amount of glue the outside edge of the Pipe Chain to secure the end caps from moving during the next steps. You can also position them without glue.
String a 2mm crimp onto one side of the beading wire. Feed the other side of the beading wire through the crimp and pull to tighten, forming a loop.
Step 2: Crimping the Wires Together
Hold each opposite end of the beading wire tightly. Use crimping pliers to form a crimp over them as they cross inside the tube. Trim the excess wire next to the crimp. You can also push the little tails of beading wire into the cap.
Tip: Sometimes it is tricky to keep the hoop tight while making the crimp. I found that the 8in length of beading wire for each hoop was enough to get a good hold on while crimping. Feel free to increase this length if you’re struggling with this step. The increase length helps for some reason. You can also bite one side of the beading wire while pulling the other side tight, leaving your hand free to use the pliers.
Let’s set up our seed bead palette. In the sample design, four colors of 8/0 and one color 15/0 are used.
The following seed bead color chart and abbreviations are referenced in these instructions:
S8A - Metallic Bronze, Miyuki 8-457
S8B - Tea Rose, Miyuki 8-4461
S8C - Silver-Lined Raspberry, 8-4268
S8D - Limestone, Miyuki 8-600
S15 - Size 15/0 Metallic Bronze, Miyuki 15-457 (used in the fringe)
Step 3: Setting Up to Begin Brick Stitch
Cut 120in of beading thread. Leaving about a 7in tail, tie a double knot onto the Pipe Chain 1in from the End Cap. Make this a tight knot. It doesn’t matter which side you start the knot on, but you can position it so that the brick stitch in comfortable for you in the next step. For me, I am right-handed, so I tied my starting knot on the left side so I can brick stitch from left to right.
Step 4: Beginning Row 1 of Brick Stitch
Working with S8A, string two beads. Bring the needle behind the Pipe Chain, then through the hoop and up around the front. Go back up through the second seed bead. At this step, it can also be helpful to feed the tail thread up through the first bead.
Step 5: Completing Row 1 of Brick Stitch
String one S8A bead and bring the needle around the Pipe Chain and back up through the bead. Repeat this until you have a total of sixteen, S8A beads, brick stitched onto the hoop.
Step 6: Completing Row 2 of Brick Stitch
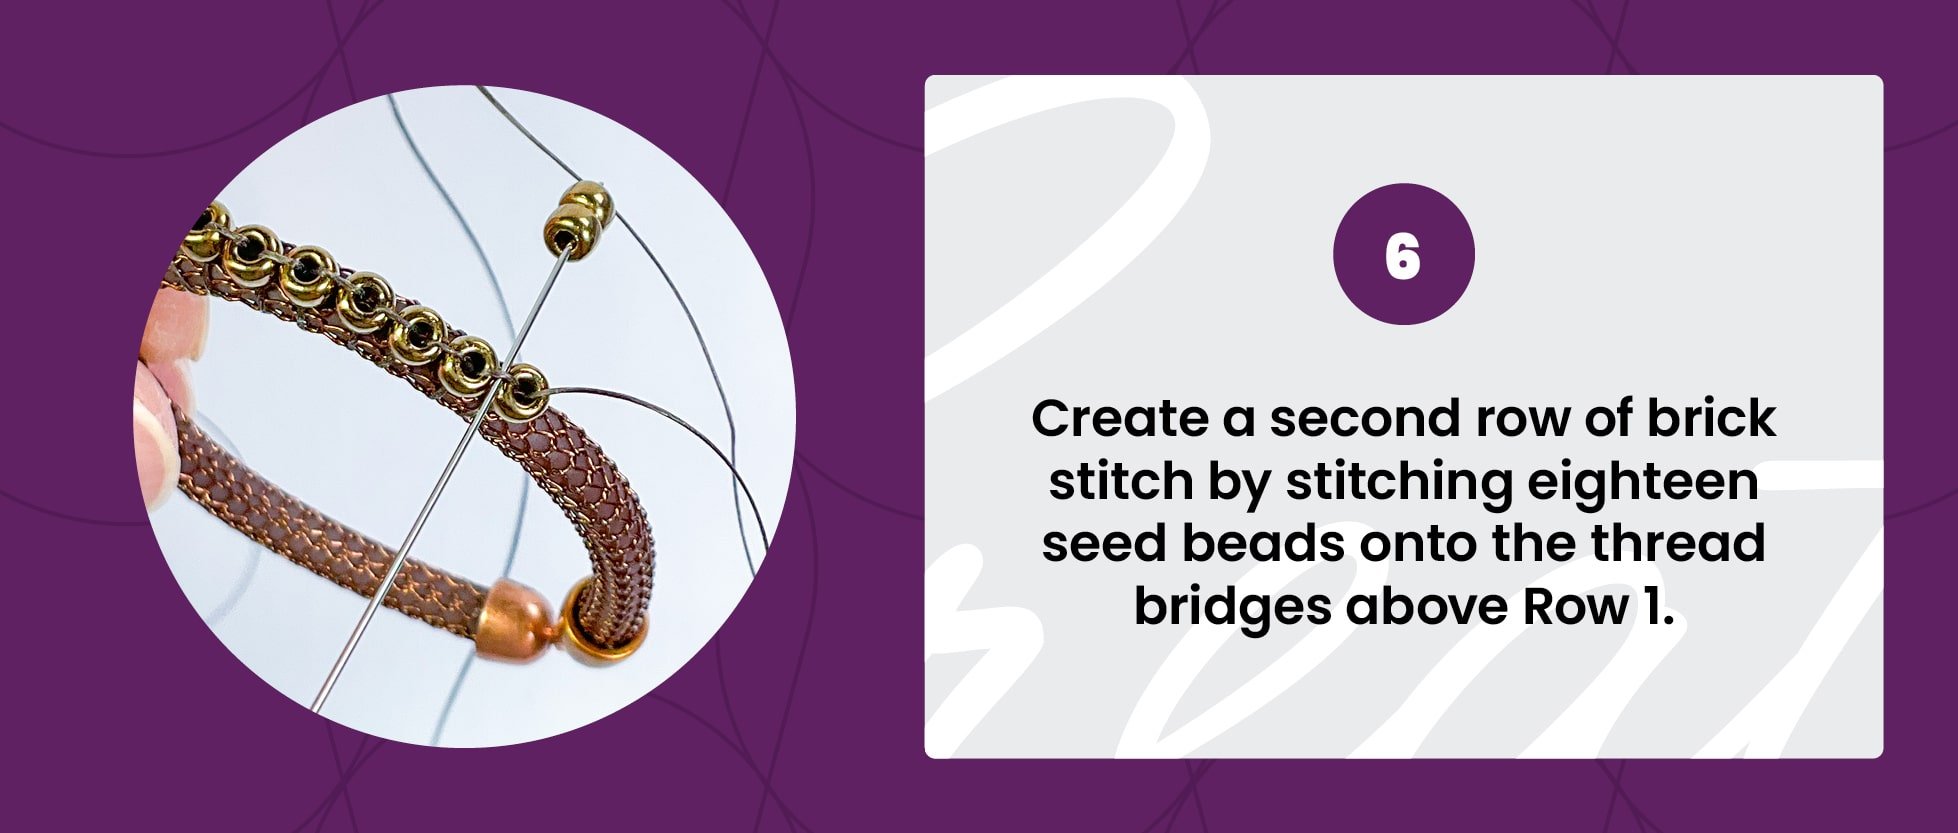
To begin, string two S8A beads. Needle under the first thread bridge. Come back up through the second bead. When you pull to tighten, these two beads will sit flat against Row 1 of the beadwork.
Next, string one, S8A bead and needle under the next thread bridge. Come back up through that bead. Repeat this until you have added a total of eight S8A beads.
When you add the ninth bead, this bead will need to share a thread bridge with the eighth bead. This ensures a steady curve around the hoop. You will have noticed an increasing in the amount of space before the next thread bridge at this point. This bridge sharing fixes that.
Resume normal brick stitch adding one, S8A bead to each thread bridge. When you reach the last thread bridge, you’ll be adding the seventeenth bead. Add one more bead to this same thread bridge, for a total of eighteen S8A beads. This completes Row 2.
Step 7: Creating Beautiful Fringe
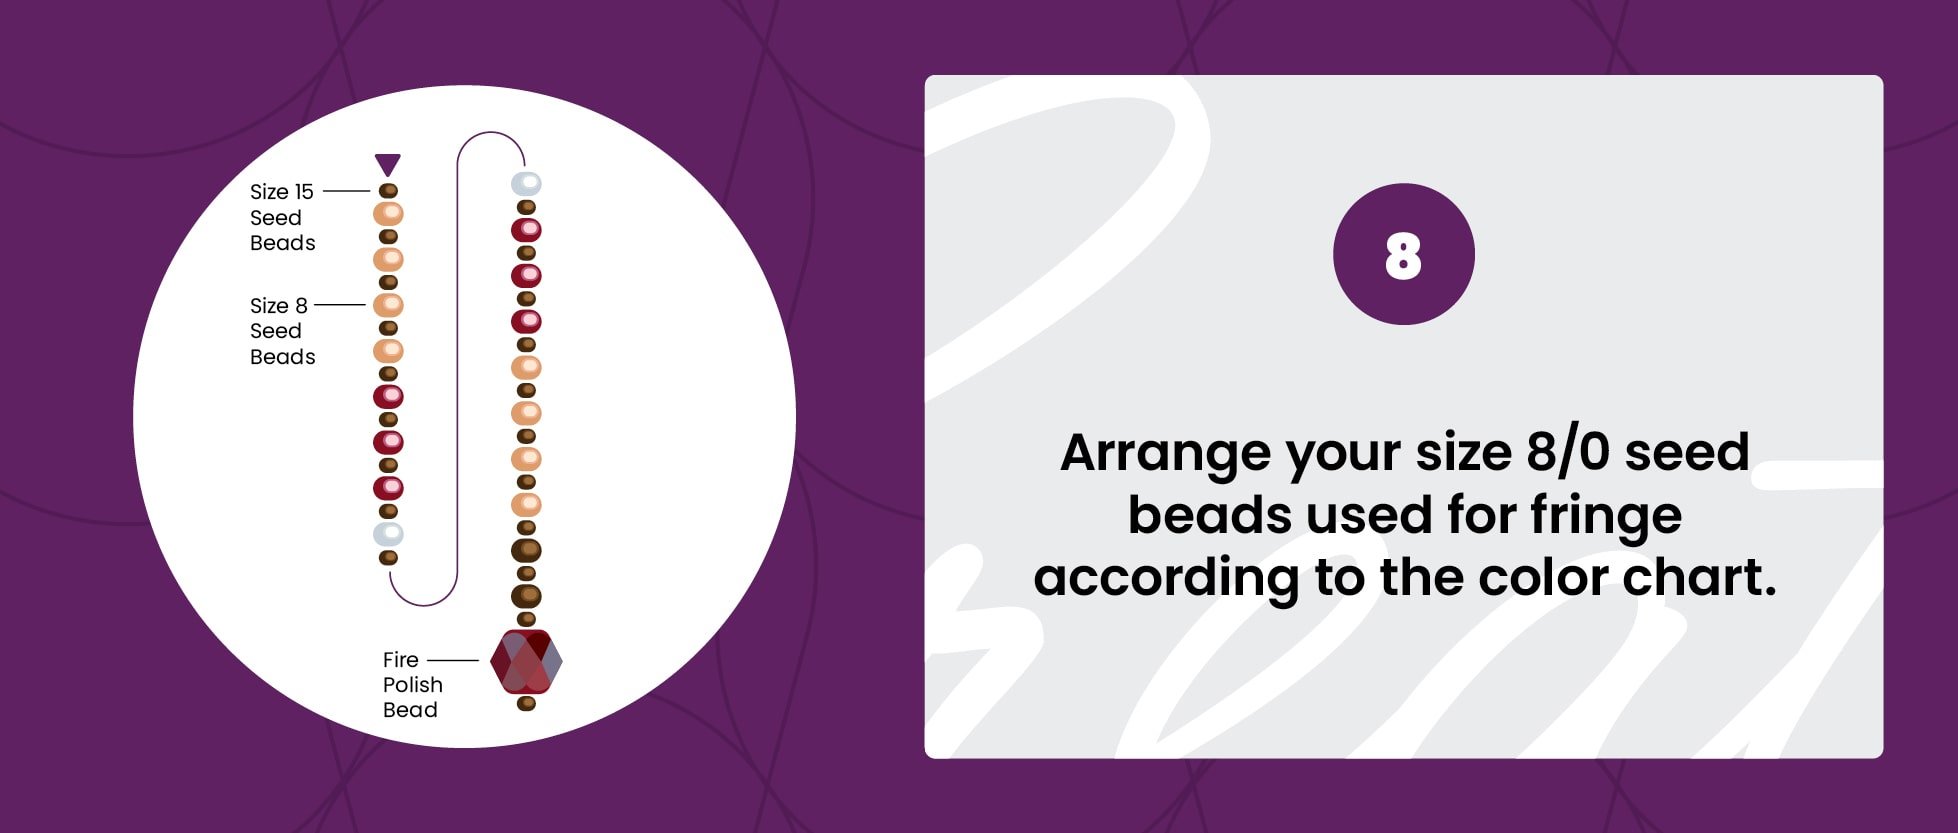
With your thread exiting from the last bead added in Step 6, string the following pattern of beads:
(1)S15 and (1)S8B four times
(1)S15 and (1)S8C three times
(1)S15 and (1)S8D twice
(1)S15 and (1)S8C three times
(1)S15 and (1)S8B four times
(1)S15 and (1)S8A twice
(1)S15 and (1)4mm Fire Polish Bead, plus (1)S15
Skipping the last S15 added in the strand, needle carefully back up through all the beads strung. Continue through the bead in Row 2 that your thread was originally exiting. Holding the skipped S15, pull the needle side of the thread to tighten the fringe strand up against the Row 2 bead.
To start the next fringe strand, go down through the adjacent S8A in the Row 2 beadwork. Repeat the above stringing pattern for each strand of fringe.
When you complete the last strand, make a knot at the thread bridge between the brick stitch rows and then weave through them to secure your thread and trim. You can also trim the tail thread.
Open the loop on an ear wire and connect it to the location where the crimp tube is. Enjoy your earrings!
Conclusion:
The statement-style gorgeousness of these earrings are sure to turn heads and get compliments. We hope you'll watch the video and try making these flowy-fringe beauties for yourself or for someone you love. Be sure to check out the video tutorial and hit the thumbs up if you enjoyed it. And do subscribe to our YouTube channel if you want to see more tutorials from us.
Follow us on social media for updates, behind-the-scenes, and more:
Youtube • Instagram • Facebook. • The SilverSilk Virtual Community
Get text notifications:
Text “hello” to +1 (918) 233-6387


